The quick & dirty tutorial:
"Ingredients & tools" cardstock, glossy paper, something to cut tags, hearts & ribbon (scissors, punches, die cut machine, whatever works well for you), adhesive (glue runner, glue stick...), ribbon, metallic mixative & alcohol ink plus an alcohol ink applicator & some felt cut to size for the applicator. You may also want to use ink &/or chalk ink to give them a little punch. I did.
You will definitely want something to protect your working surface & maybe even an apron for yourself. Alcohol ink stains. Badly. Don't ask me how I know. If you are quick enough, you can remove it with alcohol or blending solution (depending on the surface, of course).
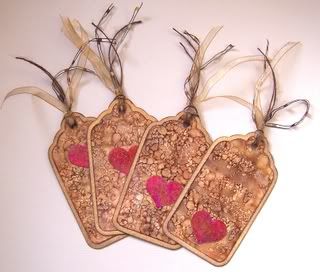
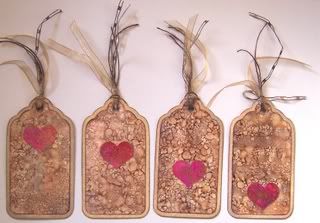
I made four tags, so my numbers below will reflect that
1) Cut out four of each of the following:
a) tags out of cardstock (I used white & then inked them but it would have saved me a little time to choose a coordinating color in the beginning).
b) tags from glossy paper a little smaller than the cardstock tags. I find that I prefer the cream colored glossy paper over the white.
c) hearts
d) ribbon &/or fiber for each tag
2) Here's where you need that protective surface! I use a 15"x18" non-stick craft sheet from Inksentials (Ranger Industries, I believe) & I love it. Grab your glossy tags, alcohol ink in the color(s) or your choice, your applicator & felt. Put your felt onto the applicator. Hold your applicator so that the felt side is facing up, carefully open up the alcohol ink & tilt it toward your applicator. When the two meet, squeeze the applicator gently for about 2 seconds. Do the same with the next alcohol ink, if using. Apply the inked applicator to your glossy tags. I find that "pouncing" works well for me. The alcohol ink dries fairly quickly. Set the tags aside.
3) Still on the protective surface, grab your hearts, the metallic mixative & whatever colors of alcohol ink you choose. I used the gold metallic mixative. I think I used the wild plum, cranberry & red pepper alcohol ink. Grab your alcohol ink applicator. At this point, I would toss the old felt & grab a new one but whatever works for you. Following the instructions, shake the bottle of metallic mixative until you hear the little ball in it rattle. Make sure the cap is on properly. If you have forgotten to do this, Dawn dishsoap works really well to remove the mixative from hand & jeans. Not sure about anything else, though. Anyway, apply a squirt or more of the mixative to the felt. Take the applicator & apply the mixative to your hearts. You can either coat the entire heart or leave chunks of space. Experiment to see what you like the best. I find that I like them both ways. Next, set this felt aside & grab a new one (or reuse the same old one). Apply alcohol ink to the applicator as in step 2. Pounce it around the heart until you feel like you are done. This should dry fairly quickly.
4) optional: ink your individual pieces if you like. Pigment ink wouldn't dry for me on the glossy paper until I used a heat tool.
5) Assemble your tags. Adhere the small tag to the larger one & then the heart on top of the glossy tag. Tie it with ribbon &/or fiber & you are all done!
I hope you liked this tutorial!